
In the pre-battery era, Hallmark ornaments simply plugged into a Christmas light strand but lights have changed over the years making many of the Magic Ornaments powerless and less magical. Hallmark introduced a Legacy Cord that was a great substitute for the compatible light strands that were proving harder to find. Unfortunately, the Legacy cord was discontinued after just a few short years.
Legacy Cord articles continue to be some of this site’s most read with reader feedback ranging from complaints and ultimatums to the sharing of alternative power solutions. A huge thanks to Chris for coming up with this alternative to the Legacy Cord and taking the time to write a very in-depth but easy-to-follow instructional. Enjoy! -HallmarkStarTrekOrnaments.com
Hello,
As with many people, I was frustrated with the discontinuing of the Legacy Cord and the sky-high prices that were being charged on eBay. As such, I have engineered a replacement solution that has worked well for me and is cost-effective. It was a substantial amount of work to get right and so I now want to share it with the broader community. I figured your site would be the best way to do that.Attached is a how-to guide for what I did to get my ornaments working. It is quite detailed but I feel that the detail is necessary to get it right.
POWER SOLUTION FOR HALLMARK LEGACY MAGIC ORNAMENTS
By Chris Litfin
INTRODUCTION
Like many people, I was quite happy to abandon the old incandescent “mini” T1¾ Christmas lights. A local hardware chain had decent strings of indoor/outdoor LED Christmas lights on sale, plus the local electric utility had “Energy Saving” rebate coupons that you could use right at the cashier, so the new LED light strings could be had for $5. Gone were the days of messing around trying to find the one burned-out (or worse, loose) bulb in a string of 100, and gone were the days of flasher bulbs being a thing.
Or so I thought – I hadn’t realized when I bought them that there was no way for me to plug in the beloved Start Trek ornaments, or the motors to make some regular ornaments spin. So, for the past ten years or so, I have been putting two different types of lights on the tree: three strings of the LED lights, plus as many of the mini light strings as I could muster. I eventually had to go on a quest one December to fins some place that actually still had mini lights to sell – I finally found some at an independent hardware store 45 minutes from home and bought all they had at an extortionate price.
More recently, I have started adding to my collection of Star Trek ships, so that I now have all of the “original” plug-in magic ornament ships. This presented another problem: in order to abide by the admonition that no more than three ornaments be plugged into a single strand of lights (though Kevin Dilmore, the Hallmark Legacy Cord, and my ornament motors say maximum 4, so who’s to say), I started having to put truly silly amounts of lights onto my 7-foot tree. It got to the point where it was hard to tell what was ornament and what was light! So, with that in mind and my mini lights not getting any younger, I decided to engineer a solution.
ENGINEERING A SOLUTION
As a bit of background about me, I teach computer engineering, mathematics, construction, and stage technology to high school students, so figuring out a solution to this problem is well within my skillset. Hey, years of fighting with cantankerous stage lighting control systems that were state-of-the-art in 1970 has to count for something!
My goal was to have a solution that:
• Used off-the-shelf parts (as much as possible).
• Required no special tools.
• Required no soldering.
• Did not permanently modify the ornaments.
• Did not run the ornaments outside of their electrical ratings.
A quick word on that last point – Hallmark’s original Magic ornaments are designed to run on 35-, 50-, 70-, or 100-bulb mini light strings. The bulbs on these strings are rated at between 2.5 and 3.5 volts. Hallmark rates the magic ornaments at up to 6 volts, to accommodate 20-bulb strings of lights which used to be more common. This means that we can run the bulbs at a maximum of 6 volts (with some fudge factor for Physics reasons). This voltage is AC (alternating current). Batteries produce DC (direct current), and so do most low-voltage power adapters, like the ones used to charge a phone. We can’t reliably use DC to power the ornaments because for Physics reasons having to do with the flashing lights and/or motion on some of the ornaments, they are not likely to work properly, if at all.
The upshot is that we need a power supply that outputs 6 volts AC (6VAC). There is a video from 2013 on YouTube that suggests running the ornaments at 9 volts or 12 volts AC or DC. The video description admits that the 12 volts DC “melted the runabout”. No wonder – they were running the ornaments at double their rated voltage and on DC instead of AC! Conveniently, 6VAC is about the smallest size of AC power supply that you can buy off-the-shelf without paying through the nose (though they can be difficult to find). So, with that figured out, on to the details of how to do this.
(As an aside, it is possible to run at least some of the ornaments using DC power; for example, the store display for 1992 Shuttlecraft Galileo powered a stock Shuttlecraft using six D-cell batteries, for a combined 9 volts DC. Whether that is a “good idea” for long-term use is up for debate and depends an awful lot on the circuitry inside the Shuttlecraft and other ornaments; for example, there could be problems with heat dissipation inside the ornament as was noted with the original 1991 U.S.S. Enterprise QLX7199. In my opinion, it is best not to open that can of worms and just give the ornaments what they are rated (and UL listed) for.)
ORNAMENT CONVERSION PROCESS
Once the dust settled, I ended up meeting all of my stated goals above – the solution that I came up with uses all off-the-shelf parts, requires no special tools (mostly) or soldering, does not permanently modify the ornaments, and runs them within their ratings. That said, you are doing this entirely at your own risk – I am not responsible if you melt your beloved ornament, burn down your house, get divorced, or anything else as a result of these instructions.
Basically, what I did was to replace the mini light bulb connector with a modern, standard, 2.1 mm barrel connector. These 2.1 mm barrel connectors are extremely common in electronics, especially on “consumer grade” security camera systems, so the parts and accessories are cheap, plentiful, and unlikely to change or disappear any time soon. This is unlike the “standard” mini light sockets, which changed whenever the manufacturer felt like it / had to dodge a patent infringement case.
A complete parts list follows near the end of this document, but for each ornament, you are going to need:
• One “jack” or “socket” 2.1 mm barrel connector, with terminal block (don’t get the ones with a detachable terminal block; they are more expensive for no benefit in this application)
• About an inch of 3/32” (2.0mm) black heat-shrink tubing
For tools, you will need:
• A small slot or Phillips screwdriver (depending on the exact barrel connector you buy, check the product page if you order online)
• A pair of scissors or a utility knife
• A source of high heat (a long-nose BBQ lighter works well; I used a mini blowtorch)
Instructions:

1. Remove the existing mini light base by gently straightening the metal prongs (see photo 1), then gently pulling the base off. The base should come off easily; don’t force it. Set the base aside to put back on the ornament later if you so choose.
2. Gently give the metal prongs a 90-degree twist, in opposite directions, so that the flat sides if the prongs are in line with each other (so that the ends of the prongs are like this: – – instead of like this: | |). See photo 2.
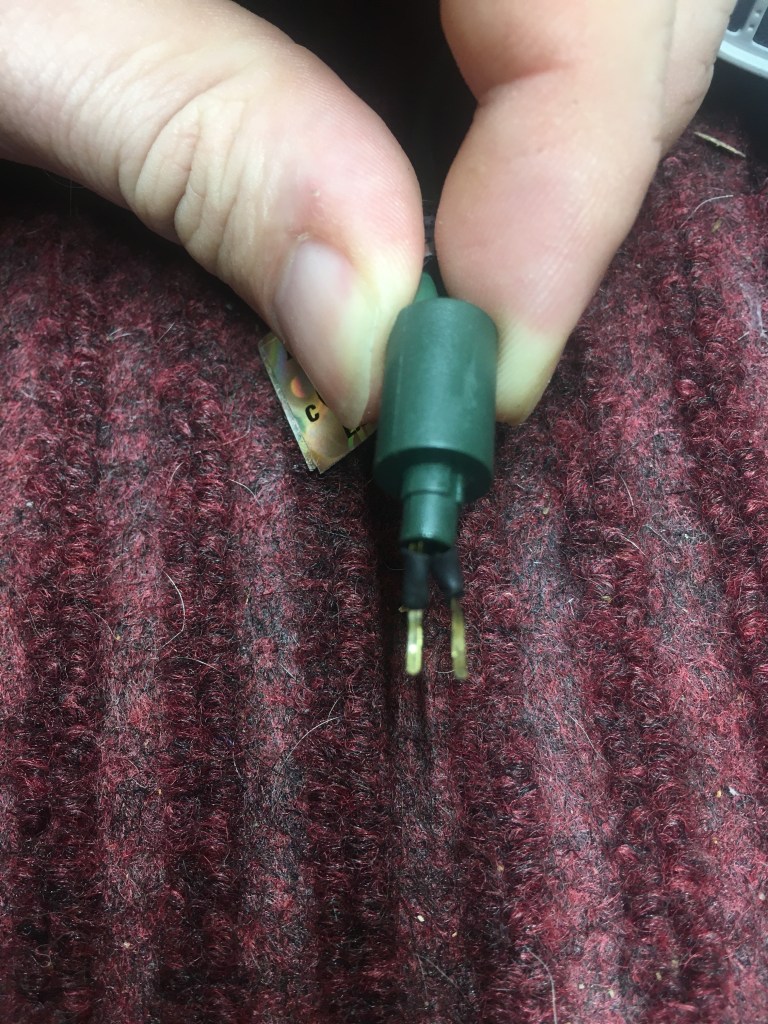
3. Cut two pieces of heat-shrink tubing long enough to cover all but the last 3/16 inch of each of the metal prongs. (I can’t give you an exact measurement because the overall length of the prongs varies).
4. Slip the heat shrink tubing over each prong, then carefully heat up the tubing with the lighter until it shrinks around the prong. Keep moving the heat source around to avoid overheating the tubing or prong assembly. The tubing will start to blister if it gets too hot. See photo 2 for what it should look like when you are done this step.

5. Insert the ends of the prongs into the terminal block on the connector far enough so that none of the uncovered metal prongs are exposed (you may have to loosen the terminal block screws first, depending on your connector). It does not matter which prong goes to which terminal block connection, because polarity does not matter for this application. See photo 3.
6. Tighten the terminal block screws onto the metal prongs. The prongs should be held firmly by the terminal block screws but they do not need to be Incredible Hulk tight.
7. Test the ornament by plugging it into your power supply. Wiggle the connection around a bit to test that the connection is snug and not intermittent. I found that on a few of the ornaments I needed to re-insert the prongs and re-tighten the terminal block screws because they didn’t make good contact. I also had a dead connector, so you may want to order a few extra just in case.
To undo the modification, reverse the above steps. The heat-shrink tubing usually slips off the prongs; if not, it can be cut off with a utility knife.
POWER CONSIDERATIONS
The single biggest rule when it comes to powering your ornaments isdo not exceed the current rating of your power supply.
Each power supply has a current rating in amps (A) or milliamps(mA); this will be listed on the power supply or the web listing. If you can’t find this information for the power supply you are looking at, don’tbuy it. EVER! For conversion purposes, 1 A = 1000 mA. All the 6VACpower supplies that I have seen have a current rating between 500 mA and2000 mA. Once you know what current your power supply is rated for,you can think of this as your “power budget” for the power supply.
Once you have your power budget, you can figure out how to“spend” it. Each magic ornament consumes a different amount of current.Add up all of the current draws for what you intend to plug in to your power supply and make sure that it does not exceed your power supply’s current rating. You may find that you need more than one power supply.
The average power use for the ornaments that I have are listed below.Your results may (and likely will) vary. You can reasonably budget thateach Star Trek ship magic ornament will draw 200mA of current (with onemajor exception!).
| Ornament | Hallmark Model Number | Current draw (mA) |
| 1991 U.S.S. Enterprise | QLX7199 | 164 |
| 1992 Shuttlecraft Galileo | QLX7331 | 96 |
| 1993 U.S.S. Enterprise D | QLX7412 | 91 |
| 1994 Klingon Bird-of-Prey | QLX7386 | 815 |
| 1995 Romulan Warbird | QXI7267 | 73 |
| 1996 U.S.S. Voyager | QXI7544 | 132 |
| 1997 U.S.S. Defiant | QX17481 | 128 |
| 1998 U.S.S. Enterprise E | QX17633 | 195 |
| 1999 Runabout U.S.S. Rio Grande | QXI7593 | 108 |
| 2000 Borg Cube | QLX7354 | 136 |
| 2002 Delta Flyer | QLX7663 | 188 |
| 2003 The Scorpion | QXI7509 | 159 |
| 2004 Vulcan Command Ship | QXI4084 | 155 |
The one major exception: my 1994 Klingon Bird-of-Prey QLX7386 uses WAY more power than anything else. I am not sure if I just got a lemon (insert joke about Klingon ship quality here) or if they all do that; I only have one and do not know of another one locally that I can test.
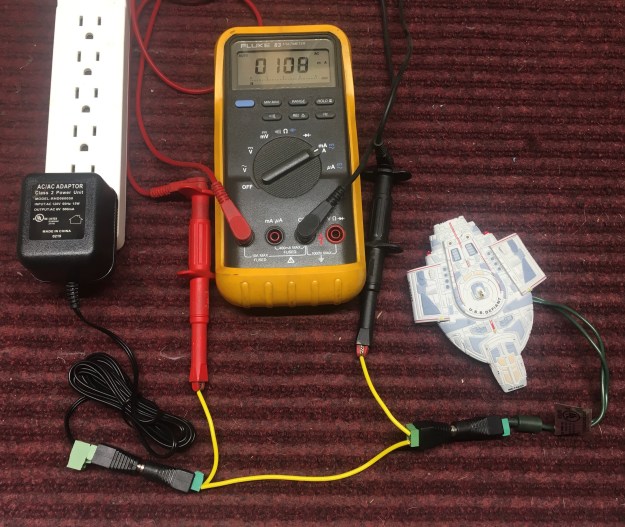
If you have something not on this list, you will likely need to measurethe current draw yourself. For that, you will need to build a breakout cableusing one “plug” and one “jack” 2.1 mm barrel connector, as shown inphoto 4, and use a digital multimeter (DMM) to measure the currentdrawn by the ornament. See the manufacturer’s instructions that came withyour DMM for how to do this. Cheap DMMs can be had for under $15;they are fine for something like this as long as they can measure at least 2A of AC current. If your DMM has prongs on the end of its wires insteadof the alligator clips that mine has, just put the prongs directly in the screwterminals instead of using the two short pieces of wire.
You can also plug in everything that you want to run from one power supply and measure the current of all the connected loads using the breakout cable. One thing that I have noticed is that the sum of all the connected loads tends to be a bit less than what you would expect by adding everything up. There are Physics reasons for this; everything from the exact nature of the circuitry inside the ornament to the fact that the electronics are pushing 30 years old and are, as Spock so aptly put it in the City on the Edge of Forever, “hardly very far ahead of stone knives and bearskins”.
Once you have figured out what is going to be connected to each power supply, you can buy the appropriate 2.1 mm barrel connector splitter cables and power cords.
WIRING UP YOUR DISPLAY
To wire up your display, you will need:
• One or more power supplies (see the previous section for help choosing your power supplies).
• If your power supplies do not have a 2.1 mm barrel connector, one “plug” 2.1 mm barrel connector, with terminal block, per power supply (don’t get the ones with a detachable terminal block; they are more expensive for no benefit in this application).
• (At least) as many 2.1 mm barrel connector splitter cables as you have power supplies. 2.1 mm barrel connector splitter cables come in 2, 4, 5, and 8-output versions. Which kind you need will depend on what ornaments you have (see “Power Considerations”, above).
• A bunch of 2.1 mm barrel connector power cords. Number and length will depend on your display, but it is better to have some extra cords/extra length on the cord than not enough. Make sure that the power cords have 2.1 mm barrel connectors on each end, one “plug” and one ”jack” – there are some on the market that have bare ends on one end, or that have a different size or style of connector on one end.
Wiring up your display is actually easier than it was with the mini lights because the cords are long enough to reach where you actually want to hang the ornament, without putting strain on the ornament. There are a couple of different ways to do the wiring:
• Run a power cord from each ornament to a splitter cable up in the tree somewhere, then run a single cable down to the power supply (this could be the cable attached to the power supply itself).
• Run an individual power cord from each ornament down to a splitter cable at the base of the tree. The drawback to this is that it creates a giant tangle of wires at the base of your tree (don’t get the wires in the water in your tree stand if you have a real tree). However, you could do super-nerdy things like hook up each ornament to a relay and be able to control each ornament individually. This level of nerdiness is outside the scope of this document.
• “Daisy chain” a bunch of 2-output splitters together. This would be especially useful if you were hanging your ornaments from a garland. (You could actually custom-make a cord with a bunch of power connectors on it instead of using the splitters, but that is also outside the scope of this document.)
Regardless of how you wire up your display, you must make sure that you do not exceed the power rating of the power supply. More on this in “Power Considerations”, above.
As for plugging in the power supplies themselves, the power supplies tend to be bulky and don’t fit well in a standard power bar. I have some“power donuts” kicking around from another project that I have used to power all of the power supplies, but “power squids” may be a better option depending on your situation. I have the whole thing plugged into a smart plug module so that I can turn things on without crawling around under the tree.
BUYING THE PARTS
The really nice thing about this solution is that it uses all off-the-shelf parts that are commonly available. A well-stocked electronic supply store will carry everything you need. I ordered everything that I needed from Newark (www.newark.com), a large electronics supplier (they go by other names in other countries, for example, Farnell or Element 14). No affiliation; they just happened to have the best price on what I needed when I was shopping. Digikey and Mouser are other well-known options, amongst others. Everything is also likely available from Amazon; however, you will likely pay more than from a dedicated electronic supplier.
Here are the Newark part numbers for what I used:
| Part Number | Description |
| 95W2645 | Connector Adapter, DC Power – 2.1 mm, 1 Positions, Jack, Terminal Block, 2 Positions, Jack |
| 01M8679 | Heat Shrink Tubing, Flame Retardant, 2:1, 0.093 “, 2.36 mm, Black, 4 ft, 1.2 m |
| 95K9172 | Barrel Power Cord, 2.1 mm Barrel Jack to 2x 2.1 mm Barrel Plug, 2 ft, 0.61 m, Black |
| 95W2629 | Audio / Video Cable Assembly, 2.1 mm Barrel Jack, 4x 2.1 mm Barrel Plug, Black |
| 95W2630 | Audio / Video Cable Assembly, 2.1 mm Barrel Jack, 8x 2.1 mm Barrel Plug, Black |
| 70AJ6535 | Barrel Power Cord, 2.1 mm DC Power Plug to 2.1 mm DC Power Socket, 4.9 ft, 1.5 m, Black |
| 01M8006 | Barrel Power Cord, 2.1 mm Barrel Plug, 2.1 mm Barrel Jack, 9.8 ft, 3 m, Black |
| 70AJ6532 | Barrel Power Cord, 2.1 mm DC Power Plug to 2.1 mm DC Power Socket, 33 ft, 10 m, Black |
| 05AC7629 | AC/AC Power Supply, Fixed, 1 Output, 120 V, 12 W, 6 VAC, 2 A |
| 13T1949 | Connector Adapter, DC Power – 2.1 mm, 1 Positions, Plug, Terminal Block, 2 Positions, Jack(SEE NOTE) |
Note: the 6VAC power supplies from Newark listed above just so happen to have a 2.1 mm barrel connector on them. If they did not, you will need to order one “plug” 2.1 mm barrel connector, with terminal block, per power supply. You will also need a wire stripper capable of stripping 22AWG wire, for example, Newark 61M0803. If you are going to make a breakout cable for measuring the current draw of your ornaments, order an extra each of the “jack” and “plug” 2.1 mm barrel connectors, with terminal block.
I should also note that 6VAC power supplies are surprisingly hard to find and you may have to hunt for them. They tend to be marketed as replacement power supplies for whatever random thing happens to need 6VAC; I have seen them marketed as replacement power supplies for fitness equipment and also as part of a kit to measure the power generated by a home solar power installation. I would strongly recommend buying your power supply from a reputable seller like any of the ones listed aboveand steering clear of “marketplace” sellers so that you will actually receive a 6VAC power supply instead of a 6-volt DC power supply that somebody mis-marketed. The electronics suppliers are also likely the cheaper option, especially if you order everything from the same place and take into account the added costs and hassles of having several smaller power supplies instead of a few larger ones. Regardless, you should check that the ratings on the actual power supply you receive are 6VAC output and the power capacity is what you expected.
IN CONCLUSION
It took me about 3 hours to put everything together, once I had received my Newark order and got all of the ornaments out of storage. This included putting everything on the tree This also included doing the measurements for power draw. With that in mind, I would budget about 5 minutes per ornament once you get the hang of what you are doing and do them in batches. You also only have to do the conversion process once, so in subsequent years it will be a lot faster.
When you have figured out what ornament is connected to what power supply, make a note of it for next year so that you don’t have to do math while decorating.
I had one ornament not work properly – one of my two 1992 Shuttlecraft Gallileo QLX7331s. Spock’s voice is garbled and the recording takes longer to play than it should. The other one and my 22 other ships all work exactly as they should. Given that my mother bought the shuttlecraft in 1992 (making it older than me) and has been on the tree one month a year ever since (for a total of over 22,000 hours!) I am not surprised that it does not work properly. Based on the testing I have done so far, it seems to want a higher voltage than 6VAC, though I dare not actually do that for fear of frying it. I suspect that it is a bad capacitor on the board, similar tothe notorious problem with the “The City on the Edge of Forever” ornament, rather than anything actually wrong with how I am powering it.(Though I notice that the Legacy Cord power adapter supplies power at 12VAC at 800 mA, likely with some electronics inside each connector on the Legacy cord, so I wonder if this is a common problem and Hallmark did the testing to show that a higher voltage is OK to combat this. Unfortunately, I don’t have access to a Legacy Cord to do tests on.)
I have had everything on the tree for two weeks now and have not had a single problem. Having eight talking ornaments talk at the same time when you turn on the power is an experience. Though I will say that having multiple Borg Cubes (I have three) telling you that “Resistance is futile” is rather apt.
All told, to get my 24 Star Trek Magic Ornaments and 6 ornament motors up and running, it cost me about $200 US before taxes and shipping. The power supplies are about half of that cost, but they go on sale occasionally.Compare that to something like $1000 for the 7 legacy cords that I would have had to buy at the going rate on eBay.
My next project is to see whether I can convert my 2001 Space Station Deep Space Nine QX6065 to run on a power supply instead of having to use batteries and pressing a button to light the thing up. Right now, it seems feasible, but I have to work out the specifics. I want to get at least one lit DS9 and my six little Star Trek Ships (1995 The Ships of Star Trek QXI4109 and 2001 Starfleet Legends QXM5325) on the tree this year. More on that to come!
This work is licensed under a Creative Commons Attribution-ShareALike 4.0 International License.


Pingback: Archives | Hallmark Star Trek Ornaments
You do not need any of that stuff. You can still buy old style mini light strings at walmart. Then do the conversion as stated in instructions in all the older ornaments. You need at least a 50 count string you can fun up to 8 ornaments on them after you convert the plugs using the bulb plugs from the light string!
LikeLike
Hi thanks so much! I really want to try this but I need a few more visuals 😆. Would you be able to post more pictures? I see the one with the DMM but that is the last one I can see. I don’t want to use the old light strings like they are intended for, I want to convert them to a plug using an adaptor like yours… could you show more examples of how you hooked the barrel connector plugs to the power supplies? Maybe a visual drawing of a sample circuit? Or a You tube? Sorry I realize this is asking a lot! I just need it a little more dumbed down concrete 😉
LikeLike
Unfortunately, that was all supplied by a reader and he would be the one that would have this info. I haven’t been brave enough to venture into myself yet.
Hopefully, he reads this and can give you some more info.
LikeLike
It’s stupid simple. I was able to convert my entire collection of like 14 or 15 ornaments inside of about an hour and a half. You simply bend the two prongs forward in order to remove the green plug cap which just slides right off, then you use two different needle-nose pliers (one to hold the middle of the prong and the other to rotate the end) to rotate the prongs 90° so that they slide into the clamps of the barrel plug adapter. You only need to rotate about half of the prong since this is about all that will fit into the clamp for the barrel plug adapter. You can determine the point at which to rotate the prong by sticking it into the clamp first to see how much space you have to work with. Once you’ve got your prongs properly positioned, just put two little lengths of shrink tube on each of the exposed rear portions of the prongs that will be sticking out of the clamp. At that point you’re ready to install the barrel plug so just slide the prongs into the clamps and torque down those little screws and you’re ready to go! Just be sure not to over-tighten the clamp screws though because those prongs are pretty fragile, although if they do end up snapping off for whatever reason it’s not really a big deal. Ultimately you could just remove the whole plug assembly entirely and connect the barrel plug adapter directly to the lead wires, but there’s no reason to really do so unless it’s absolutely necessary.
Honestly the most frustrating part of it all is finding the best power supply for different ornaments. In my experience I’ve found that some look much better at slightly higher voltages while some need to be kept at 6v. I picked up two 6vac power supplies in 1100mA, and then a 7.5v in 1200mA and an 8.5v in 1000mA. I still have to get a 3v DC supply to power my DS9 once I finish modifying it to run off of a wall adapter without the base. I can run 3 to 5 ornaments off each power supply by linking them up in a “daisy chain” type arrangement via splitter cables (like the ones intended for CCTV systems and such). The cables come in a few different styles, but I’ve found the ones arranged in a zig-zag type pattern to be the best for this particular application, however it really just depends on your preference.
I recommend getting a multimeter too if you don’t have one already… It’s a good idea to determine the amperage draw for each of your ornaments so you don’t overload your power supply. So if you have a power supply with an output of 1Amp or 1000mA, you can power as many ornaments with it as you want until you reach that limit. For example I can only connect two to three ornaments to the supply powering my Klingon Bird of Prey/B’Rel Class ornament because that particular one draws huge amperage for whatever reason (my guess is that rapid flashing light in the nose).
LikeLiked by 1 person
Could you do the same with a usb plug?
LikeLike
USB is DC, not AC
LikeLike
He did mention that the shuttlecraft worked at the Hallmark store on 9V DC , 6 D cells. For anyone reading this, I’m going to try a phone charger on our shuttlecraft.
LikeLike
Theoretically, sure. You could do a USB-A, Micro-USB, or USB-C. However Idk why you would because any USB power supply is going to be a DC output. You would also have to remove the entire plug assembly to expose the lead wires in order to connect the USB plug. The barrel socket plugs are just easy and convenient because they use little terminal blocks that connect via clamps that tighten using screws. I’m not sure if they make USB plugs that use the same type of terminal block clamps. I wouldn’t be surprised if something like this existed, but most of the AC power supplies I’ve seen use 2.1mm barrel sockeg plugs. Although you could just cut this off and strip the wires in order to install a male USB plug of your choice. At any rate I’m sure you could do a USB plug setup if you really wanted to, but personally I just don’t really see why you would want to. It just seems like you’d be creating additional unnecessary work for yourself, but ultimately it’s up to you.
LikeLiked by 1 person
I have a Legacy cord. The power supply says 12 vac but it tests as 14.6vac! I’m not sure what the green box plug things do (heat dissipation?) but they also test at 14.6vac. I set up a 6vac power supply (tests at 6.8vac) as above and it works fine for some ornaments. The shuttlecraft does indeed require more power and works fine on the Legacy cord. I have 8 ornaments on the 6vac transformer, including the Klingon Bird-of -Prey and it draws .8amps total. Some appear dimmer than usual. I might try a 9vac transformer.
LikeLike
Has anyone tried to see what is inside that Legacy cord green box with an ornament plug? Any circuitry there?
LikeLike
I ordered exactly the same power adapter, but received one with the exact specs except for the wattage. The one they sent me was 16w and the one described in this article is 12w. What type of issues will this cause?
LikeLike
16w or 16v?
LikeLike
I have 10 of the “legacy” ornaments and wanted to put them up this year. After some confusion and Googling, I came to understand the power issues and how Hallmark has abandoned us. I found one old string of filament bulbs, but didn’t want to play those dumb games: how many bulbs are there, how many ornaments can you run on a string, will they all work correctly…
Once I understood that 6VAC was the goal, I found and ordered a 6VAC transformer, and spent some time in the shop: I dismantled the existing filament string and created a new one with 10 sockets in parallel instead of series. I’d read that there’s something weird about the Klingon BOP and it did some strange things at first, but once I had several ornaments connected and the transformer voltage came down a bit (it’s about 7.5 volts with no load) the Klingons settled down. Now I have the entire string on the tree and everything works fine. All are getting their desired voltage and the total draw for 10 is about 850 ma, no strain on the 2A rating of the transformer. A lot of soldering and shrink tubing, but my fleet now sails into the future.
LikeLiked by 2 people
My Klingons are overheating with the same setup.
LikeLike
Can you measure the Klingon BOP’s current draw? Either there’s a variation between ornaments or the circuit can ‘flip’ into a bad state. My BOP also got very warm in initial tests but as per my post, now runs as cool as Andoria. I can’t explain that other than to guess it’s very sensitive to over-voltage.
If your ship is drawing too much current you could try a dropping resistor in series.
LikeLike
My Klingons days of glory are over. It used to draw around 800mah, but now it is no longer working.
LikeLike
16w. The OP listed one with 12w.
LikeLike
Strange, but ok. 16W at 6VAC = 2.66A. As long as it is 6VAC, it is a better transformer than the one mentioned in the article. This means that you can hook up more ornaments to it.
LikeLike
Wow! Great minds think alike!!! After a new tree pre- lit with LED’s, i also needed a solution to the probirm. I have 10 Hallmark Magic Ornaments. I dont mind soldering, so I bought a pack of 10 2.5mm plugs and sockets, pigtailed. (Amazon). I shortened the plug end of the pigtails and attached them to the original leads on the ornaments, then i got a spool of 24v gauge jacketed ( also Amazon) wire and made up a 12′ cord with a female socket pigtails. All the connections are shrink tubed. This cord can be tucked in so not too visible! The pigtails and leads add up to about 8″. Plenty to be able to hang the ornaments! I’m still working on the power supply. So far I’m testing a 5v DC Tablet charger. It’s 300 ma. Everything works, but as I added each ornament, i noticed a small voltage drop,,and some of the ornament lights were noticeably dimmer, and the carousel would not spontaneously play when the power is first applied, as it always had done on the old mini light set.
You have saved me quite a bit of time, as I can add up the amperage according to your chart, and get a 6v Ac power supply, of the appropriate rating.
LikeLike
So, I did some testing with my Bird of Prey and it is very inconsistent on the power draw. One thing is for sure though, it is higher and doesn’t like sharing its power supply. If I plug it in with my other Trek ornaments, they all shut down. My guess is a bad capacitor.
LikeLike
Thank you to the author of this post – although a prior commenter is correct, I could’ve used an incandescent string and popped out a few bulbs, this workaround allowed me to keep my programmable LEDs on the tree without the mixing and matching, and still brings my legacy ornaments back to life……all at about a third of the cost of the legacy power cord on eBay. One question for anyone that can answer….I did not use a multimeter to measure the mA draw of each ornament, I plugged my 6v ac power supply (exact one mentioned in the post) into a power meter plugged into an outlet. For four ornaments (Romulan Bird of Prey, Klingon Warbird, Enterprise D, and the Jetsons bubble ornament) connected and powered simultaneously through a daisy chain, it was measuring only 40 mA total draw. Is this method of measurement somehow inaccurate or not effective? I was expecting much higher especially for the Klingon Warbird, and the Jetsons ornament also has flashing and solid lights. It’s meaningful to me because…..although I am experiencing no problems with these four….. I want to add more ornaments and would like to know how much power I have left before I need another power supply. Thanks again!
LikeLike
Thanks for this detailed tutorial. I bought the AC adapters and other items that you linked but if I plug in only one ornament, it gets quite hot after a couple of minutes. If I plug in more, will that somehow reduce the voltage that each ornament is getting so that they will run cooler? Please let me know. Thanks.
LikeLike
Does anyone know if the author ever succeeded in converting his DS9 station from battery to power and the button trigger issue? In addition to solving the wired legacy ornaments, I’d also like to convert the battery units to linear power as well.
LikeLike
I did actually, however strictly for the purposes of the actual model itself (as in I just wanted to be able to hang up the space station model and have it powered so that the lights would be on. It’s on it’s own little circuit with a 3VDC power supply with an on/off switch. I bought an adapter cord that had a switch built into it with a 2.1mm barrel socket plug on one end and bare lead wires on the other. I soldered some mini alligator clips to the lead wires and these just clamp on to the little exposed metal tabs on the ends of two of the three pylons of the model (the two that insert into the base in order to complete the circuit when the station is attached to the base). This allows me to have the DS9 station illuminated when it’s hanging freely in the tree, but then if I want to display it by itself I just have to remove the alligator clamps and stick it back on the base. Theoretically I could have the base run off of a DC power supply as well if I really wanted to, but I don’t really see the point. I’ve done something similar with another model in the past, and it was just a bunch of unnecessary work when it worked fine as it was running on batteries lol. If you’re having issues with the button sticking, it would just be as easy as taking the base apart and cleaning up the little button switch with some contact cleaner or something. Otherwise you could replace it too if you really needed to. It’s just a basic little microswitch. Honestly it shouldn’t really be sticking unless it’s just the plastic cap button that sits on top sticking to the surrounding plastic of the housing in which it sits. In that case a tiny little drop of plastic lubricant or perhaps dry silicone lube might keep it from getting stuck. It’s just low quality ABS which can degrade and kinda stick to itself over time, especially the older it gets, so putting some plastic lube or dry silicone in there will coat the surface and act as a barrier between the two plastic surfaces and prevent them from sticking to one another.
LikeLike
LikeLike
Looked at this tutorial 2 years ago and finally decided to give it a try this year as I’m tired of finding a working string of incandescent every year and it’s fun to tinker. It’s working great! I have only 4 ornaments– so I just bought a few more from ebay lol. The power display does get a little warm, but not hot.
LikeLike
Awesome news. Keep an eye on it. Happy holidays!
LikeLike
The power supply failed after 2 days! No damage to my ornaments. But it looks like it was just a bad supply. Newark sent me a replacement and the new one has been working fine and runs cool. I even got a few more ornaments off of ebay to plug in. Thanks again for the tutorial!
LikeLiked by 1 person